
Documentation
Install Blipit
Pick what your app is built with. You get the exact steps from its guide, and one click shows them in app.blipit.io with your own keys filled in.
1Pick your stack
2Steps for Any website
Signed in to Blipit? Open your keys page to see these steps with your project's keys already filled in, ready to copy.
Show my keysInstall npm install @blipit/browser
1Get your keys
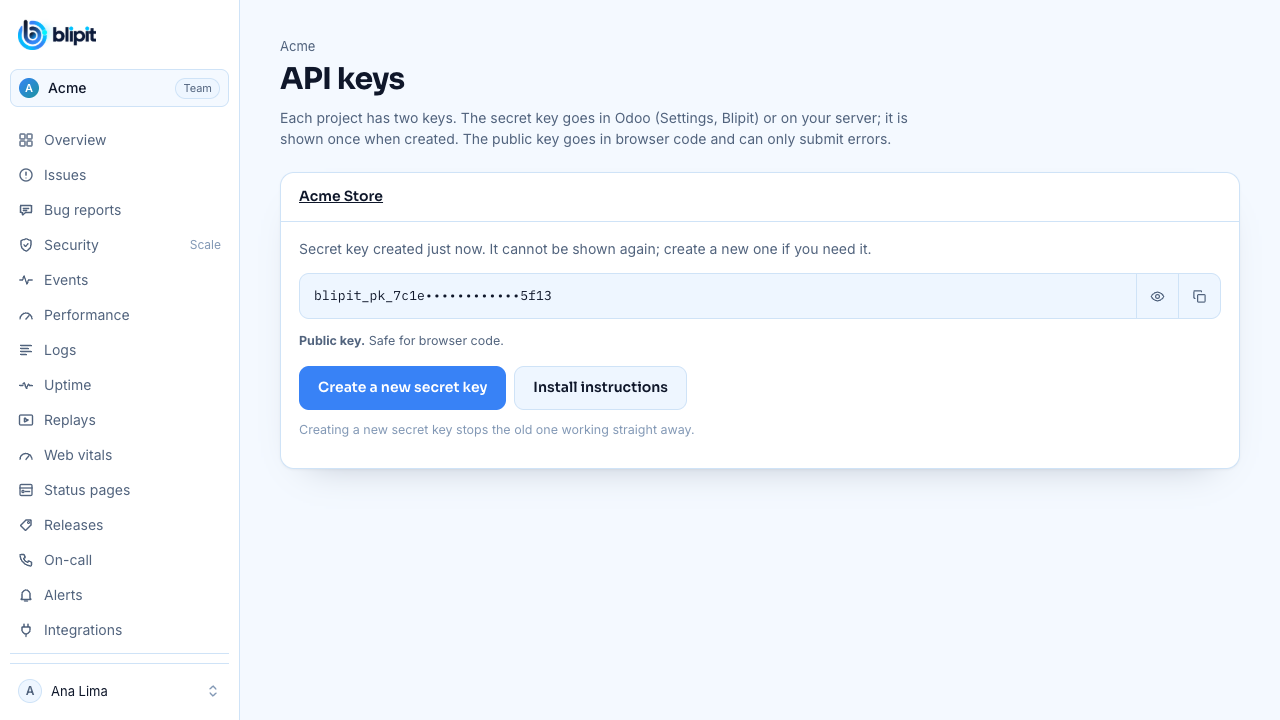
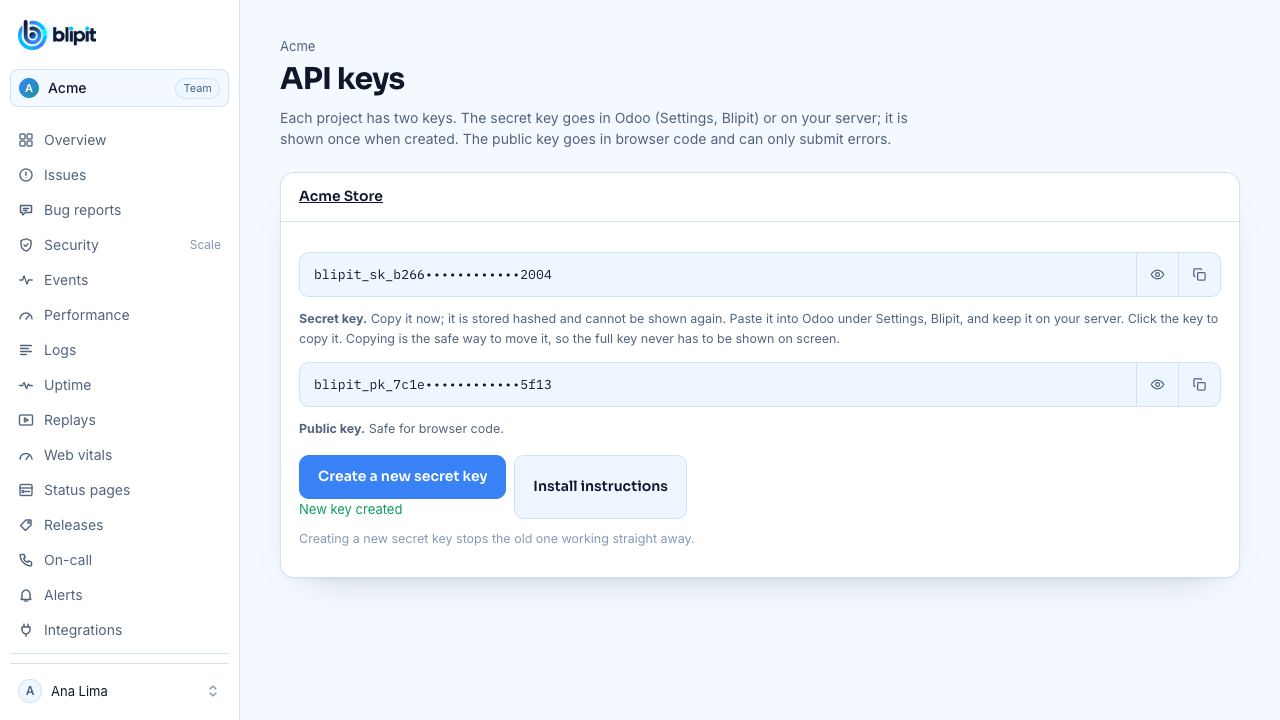
Sign in at app.blipit.io and open API keys in the sidebar, then your project. Every project has two keys. The public key starts with blipit_pk_: it goes in browser and app code, can only send events, and is safe for anyone to see. The secret key starts with blipit_sk_: it stays on your server or in Odoo, never in a browser, because it can also read and change issues. The secret key is shown only once, right after it is created, so copy it then; if you lose it, press Create a new secret key, and the old one stops working at once. Some SDKs also need the project id, shown on the same page.
2With npm
Call init once in your entry file, before the app renders, with the public key. With Vite (React, Vue, Svelte), keep the key in .env as VITE_BLIPIT_KEY; only VITE_ variables reach the browser, and the dev server reads .env only when it starts.
npm install @blipit/browserVITE_BLIPIT_KEY=blipit_pk_your_public_keyimport * as Blipit from "@blipit/browser";
Blipit.init({
key: import.meta.env.VITE_BLIPIT_KEY,
environment: import.meta.env.MODE,
release: "2026.09.28",
replay: { onErrorSampleRate: 1 },
});3Without a bundler: one script tag
Paste this into the <head> of every page, or into your platform's custom code slot, with your public key written in. That is fine: the public key can only send events.
<script src="https://blipit.io/sdk/blipit.js"></script>
<script>
  Blipit.init({ key: "blipit_pk_your_public_key", environment: "production", release: "2026.09.28", replay: { onErrorSampleRate: 1 } });
</script>4Keep keys out of git
Keep keys in environment variables or your host's secret settings, never in code you commit, and add your .env files to .gitignore. A public key in a web page is normal. If a secret key ever ends up in git, a public page, a screenshot or a chat, open API keys, press Create a new secret key, and paste the new key wherever the old one was used: the old key stops working straight away.
.env
.env.local
.env.*.local5Tell Blipit who the user is (optional)
After sign-in, attach the user so issues show who was affected and replays can be found by user.
Blipit.setUser({ id: "42", email: "ana@example.com" });6React, Vue, Angular and Svelte: report caught errors
Frameworks catch errors inside components before the browser sees them, so pass those to Blipit too. Uncaught errors anywhere else are reported on their own.
createRoot(document.getElementById("root")!, {
  onCaughtError: (error) => Blipit.captureException(error),
  onUncaughtError: (error) => Blipit.captureException(error),
}).render(<App />);class ErrorBoundary extends React.Component<{ children: React.ReactNode }, { failed: boolean }> {
state = { failed: false };
static getDerivedStateFromError() {
return { failed: true };
}
componentDidCatch(error: Error) {
Blipit.captureException(error);
}
render() {
return this.state.failed ? <p>Something went wrong.</p> : this.props.children;
}
}const app = createApp(App);
app.config.errorHandler = (err) => Blipit.captureException(err);
app.mount("#app");import { ErrorHandler } from "@angular/core";
import * as Blipit from "@blipit/browser";
class BlipitErrorHandler implements ErrorHandler {
handleError(error: unknown) {
Blipit.captureException(error);
console.error(error);
}
}
export const appConfig = { providers: [{ provide: ErrorHandler, useClass: BlipitErrorHandler }] };import * as Blipit from "@blipit/browser";
import type { HandleClientError } from "@sveltejs/kit";
export const handleError: HandleClientError = ({ error }) => {
Blipit.captureException(error);
};7Bug reports: the Report a bug button
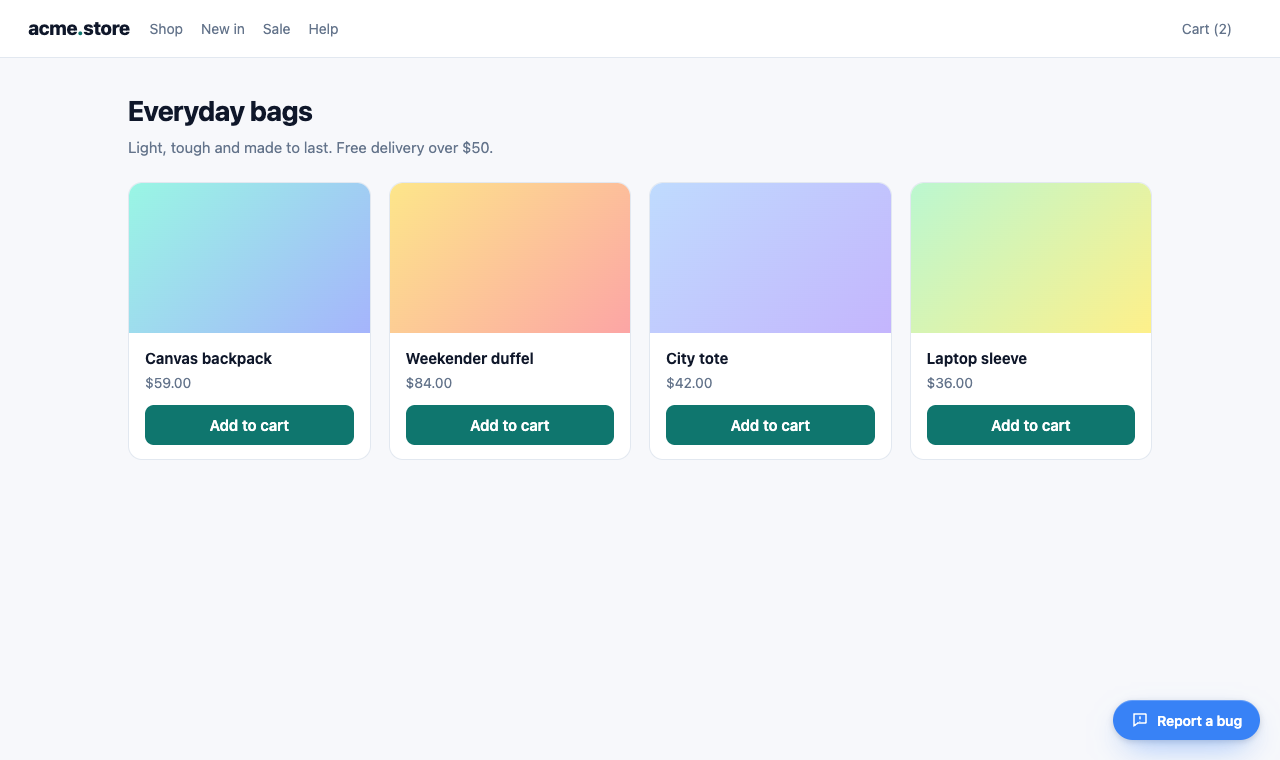
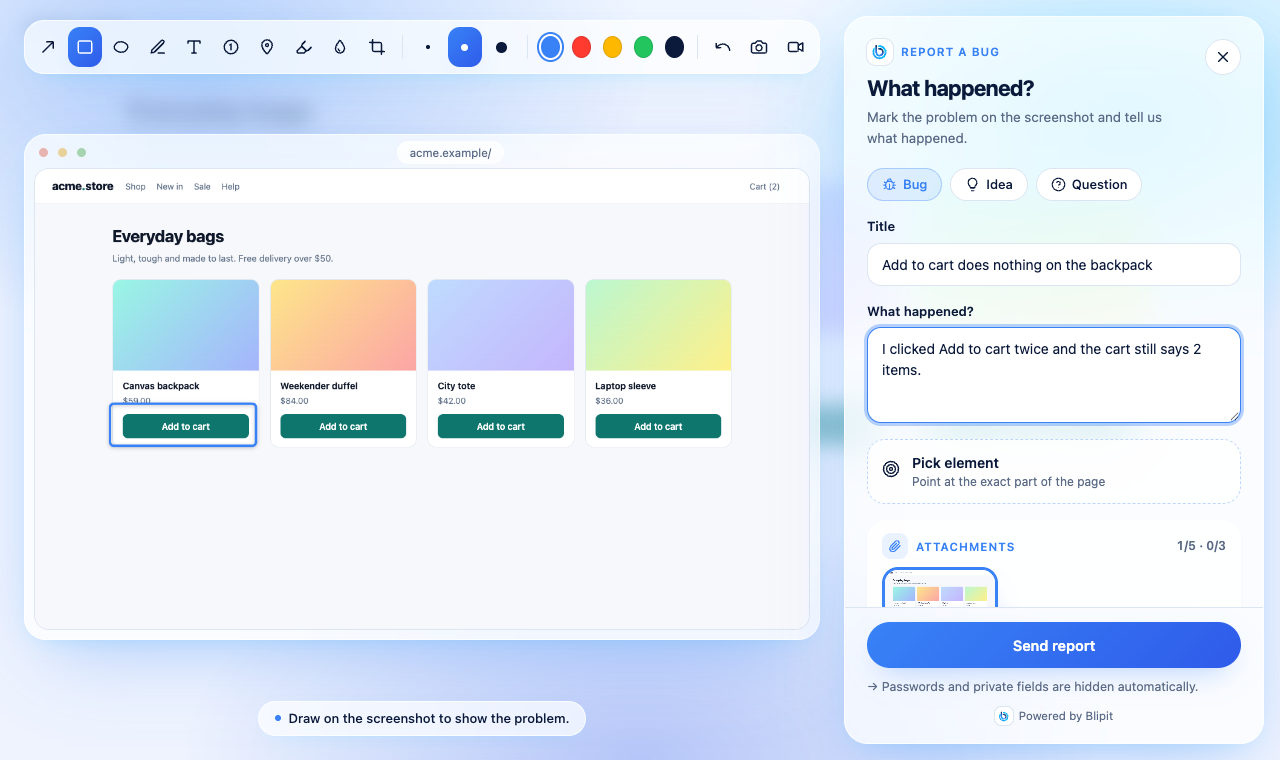
As soon as the SDK starts with your public key, a Report a bug button appears in the bottom-right corner of every page, in the visitor's language. A click opens the reporter: a screenshot of the page to mark up, an element picker, an optional screen recording, and a title and description. Change the position, style, text, colour and keyboard shortcut in code, as below, or for every site at once in app.blipit.io, Project settings, Bug report widget; options in code win. The Bug report button guide shows every option with screenshots and a live demo.
Blipit.init({
  key: import.meta.env.VITE_BLIPIT_KEY,
  feedbackWidget: {
    position: "bottom-left",
    style: "icon",
    text: "Report Issue",
    color: "#E11D48",
    shortcut: "ctrl+shift+b",
  },
});
8Open the reporter from your own button
To put a Report a bug button in your own header or menu, use the official one: Blipit.reportButton() returns a ready-made button with the Blipit icon and Report a bug in the visitor's language, and React apps can render <BlipitReportButton /> from @blipit/nextjs/react (npm install @blipit/nextjs). Prefer your own design? Call openReport() from any click handler, or attachReport(element) to wire up an element that already exists. Either way the reporter opens exactly as it does from the floating button. The Blipit icon may only be used next to Report a bug, as the official button shows.
<nav id="help-menu"></nav>
<script>
  document.getElementById("help-menu").append(Blipit.reportButton());
</script>import { BlipitReportButton } from "@blipit/nextjs/react";
export function Header() {
return (
<header>
<a href="/">Acme</a>
<BlipitReportButton variant="outline" size="sm" />
</header>
);
}<script setup>
import { onMounted, ref } from "vue";
import { reportButton } from "@blipit/browser";
const slot = ref();
onMounted(() => slot.value.append(reportButton({ variant: "outline", size: "sm" })));
</script>
<template>
<span ref="slot"></span>
</template><button id="report-issue">Report Issue</button>
<script>
Blipit.attachReport(document.getElementById("report-issue"));
</script>
<button onclick="Blipit.openReport()">Report Issue</button>import { openReport } from "@blipit/browser";
export function ReportIssue() {
return <button onClick={() => openReport()}>Report Issue</button>;
}<script setup>
import { openReport } from "@blipit/browser";
</script>
<template>
<button @click="openReport()">Report Issue</button>
</template>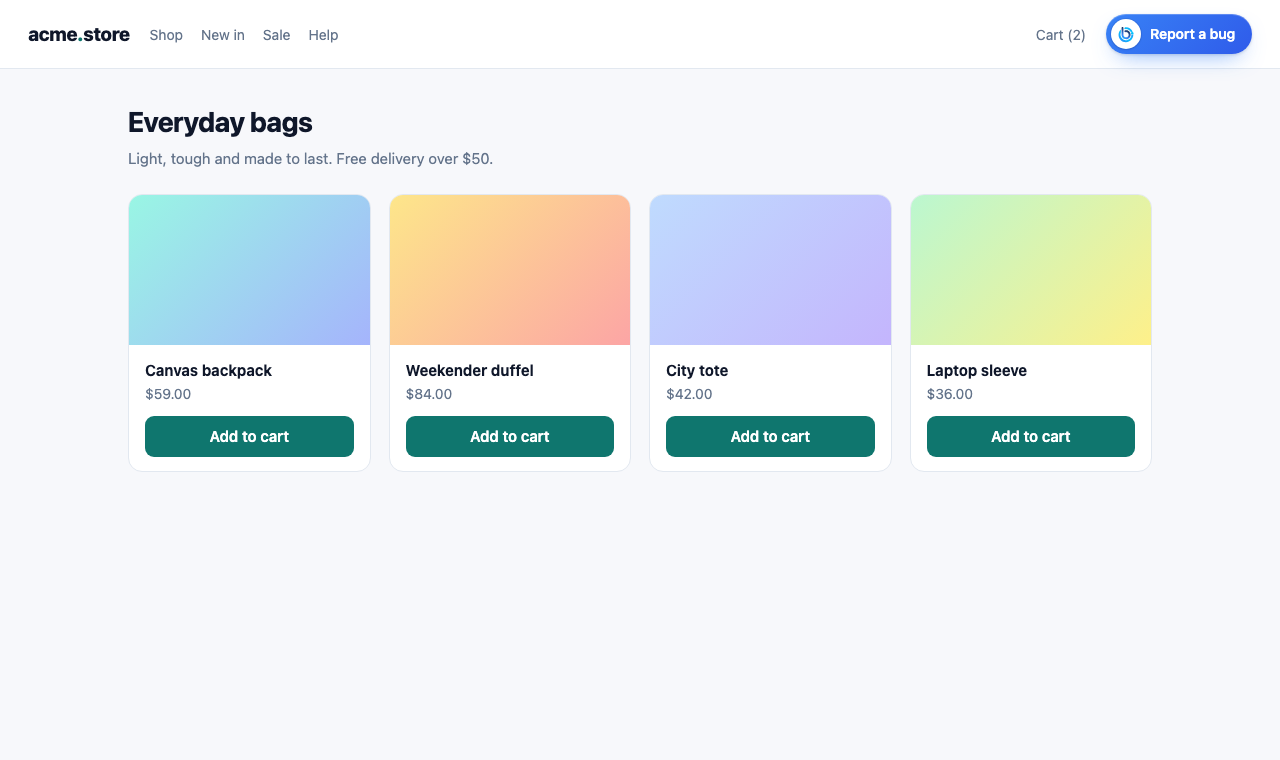
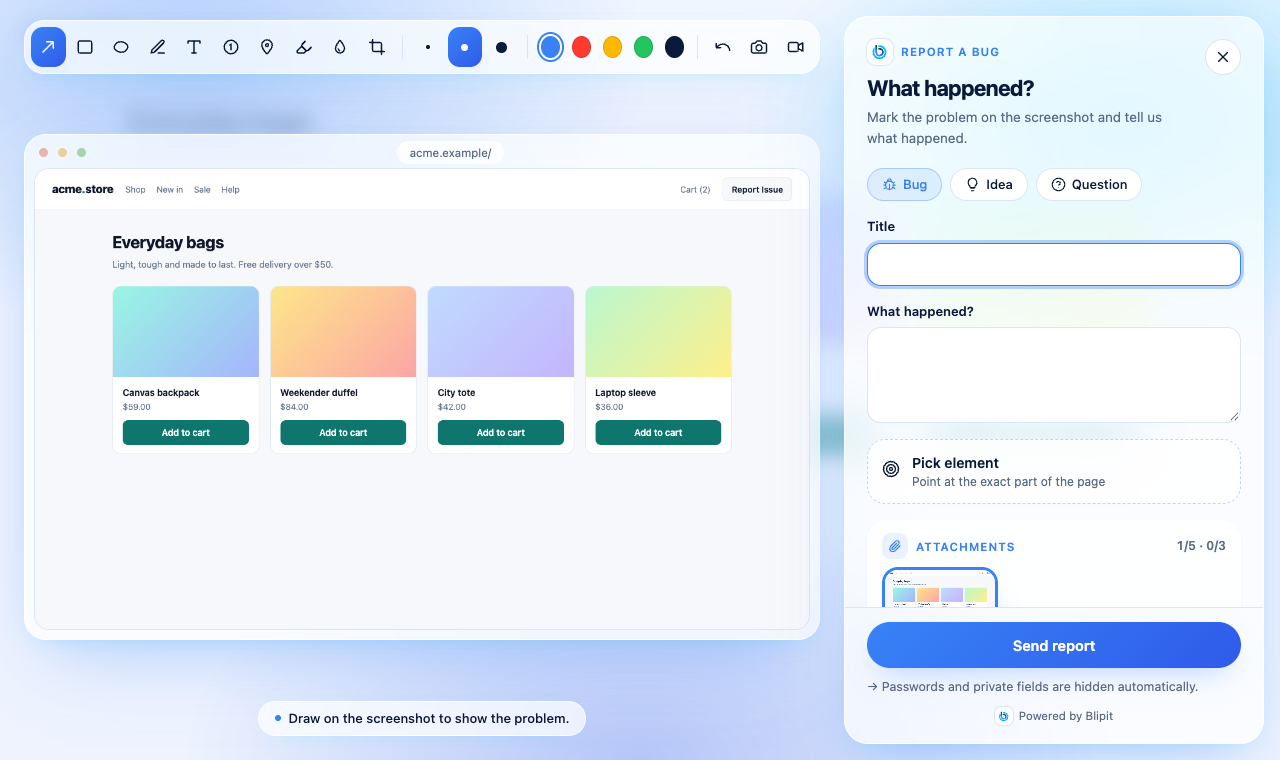
10Prefill the reporter and add context
Call setUser after sign-in: the reporter's name and email are filled in, and they get an email when you reply or change the status. setReportMetadata adds your own fields, such as the plan or the cart size, to every report; it runs when a report is sent, so the values are current.
Blipit.setUser({ id: "42", username: "Ana Lima", email: "ana@example.com" });

Blipit.setReportMetadata(() => ({ plan: "pro", cartItems: cart.length }));11All options and functions
- key: the public key (blipit_pk_). Required.
- environment and release: shown on every event; release powers regressions and source maps. environment defaults to production.
- debug: true logs what the SDK does to the console, with lines that start with [blipit].
- sampleRate (0 to 1), ignoreErrors (strings or patterns) and beforeSend (edit an event, or return null to drop it) control what is sent. autoMuteExtensions (on by default) drops errors that come only from browser extensions.
- webVitals (on by default), replay ({ sessionSampleRate, onErrorSampleRate }) and autoSessionTracking (crash-free rates, needs release).
- feedbackWidget: false hides the Report a bug button, or an object with position, style, text, color and shortcut changes it. theme: "light", "dark" or "auto" sets the reporter's theme.
- user ({ id, name, email }) and company (a name or { id, name }) fill in the reporter and are added to reports.
- endpoint: only for a self-hosted ingest; the default is https://in.blipit.io/api/v1/events.
- Functions: captureException(error), captureMessage(text, level), setUser, setTag(key, value), addBreadcrumb({ category, message }), openReport(), attachReport(element), reportButton(options), updateWidget(options), setReportMetadata(fn), showFeedback() and flush(), which returns a promise once queued events are sent.
- Widget settings changed in the dashboard reach browsers within an hour, because the SDK keeps them that long; a private window shows the change at once.
12Check it works
Reload your site. The Report a bug button appears in the bottom-right corner, and within a minute the page view shows under Web vitals in app.blipit.io. Then send a test event: call captureMessage once from your code, or with the script tag run the line below in the browser console. It shows under Issues within a few seconds.
Blipit.captureMessage("Hello from " + location.host, "info");2Steps for Next.js and React
Signed in to Blipit? Open your keys page to see these steps with your project's keys already filled in, ready to copy.
Show my keysInstall npm install @blipit/nextjs
1Install
npm install @blipit/nextjs2Get your keys
Sign in at app.blipit.io and open API keys in the sidebar, then your project. Every project has two keys. The public key starts with blipit_pk_: it goes in browser and app code, can only send events, and is safe for anyone to see. The secret key starts with blipit_sk_: it stays on your server or in Odoo, never in a browser, because it can also read and change issues. The secret key is shown only once, right after it is created, so copy it then; if you lose it, press Create a new secret key, and the old one stops working at once. Some SDKs also need the project id, shown on the same page.
3Put the keys in .env.local
Create .env.local in the project root with the public key for the browser and, if you use the server side below, the secret key for the server. Only names that start with NEXT_PUBLIC_ reach the browser, so never give the secret key that prefix. Restart npm run dev after saving the file. For production, add the same variables in your host (on Vercel: Project, Settings, Environment Variables, for Production and Preview) and deploy again: NEXT_PUBLIC_ values are written into the build, so a deployment made before you added them has an empty key.
NEXT_PUBLIC_BLIPIT_KEY=blipit_pk_your_public_key
BLIPIT_SECRET_KEY=blipit_sk_your_secret_key4Browser side
Add the component once in the root layout. It reads the public key from NEXT_PUBLIC_BLIPIT_KEY. If the variable is empty, it starts nothing and says so in the browser console.
import { Blipit } from "@blipit/nextjs";

export default function RootLayout({ children }: { children: React.ReactNode }) {
  return (
    <html lang="en">
      <body>
        <Blipit
          publicKey={process.env.NEXT_PUBLIC_BLIPIT_KEY!}
          environment={process.env.NEXT_PUBLIC_VERCEL_ENV ?? "development"}
          release={process.env.NEXT_PUBLIC_VERCEL_GIT_COMMIT_SHA}
          replay={{ onErrorSampleRate: 1 }}
        />
        {children}
      </body>
    </html>
  );
}5Server side
Next.js 15 and later call onRequestError for errors in server components, route handlers and server actions. One line in instrumentation.ts wires it to Blipit. From @blipit/nextjs 0.2.1 the same line also works in apps with a middleware.ts and in Edge routes (runtime = "edge"): the app builds, and middleware and Edge errors are reported too. Next.js 14 has no onRequestError, so wrap each route handler and server action in withBlipit instead, as in the second example: it reports the error and throws it again, and skips redirects and notFound(). Set BLIPIT_SECRET_KEY in the server environment, never as NEXT_PUBLIC_.
export { captureRequestError as onRequestError } from "@blipit/nextjs/server";import { withBlipit } from "@blipit/nextjs/server";
export const GET = withBlipit(async (request: Request) => {
return Response.json(await loadOrders());
});6Dependencies and server health
From @blipit/nextjs 0.3, export register as well, so Blipit starts when the server boots. It then records database and outside-service calls on the Dependencies page and the server's CPU, memory and event loop on Server health. It does nothing in the Edge runtime. On Vercel, register may not see the incoming request: from @blipit/nextjs 0.4, wrap route handlers and server actions in withBlipit and each becomes a request on the Pulse page with its database and outside-service calls, sent after the response without delaying it.
export { captureRequestError as onRequestError, register } from "@blipit/nextjs/server";import { withBlipit } from "@blipit/nextjs/server";
export const GET = withBlipit(async (request: Request) => Response.json(await loadOrders()));7Errors caught by error.tsx
Errors that an error.tsx or global-error.tsx boundary catches never reach the browser's error handler, so report them from the boundary. Both files are client components.
"use client";

import { useEffect } from "react";
import { captureException } from "@blipit/nextjs";

export default function Error({ error, reset }: { error: Error & { digest?: string }; reset: () => void }) {
  useEffect(() => {
    captureException(error);
  }, [error]);
  return (
    <div>
      <p>Something went wrong.</p>
      <button onClick={() => reset()}>Try again</button>
    </div>
  );
}"use client";
import { useEffect } from "react";
import { captureException } from "@blipit/nextjs";
export default function GlobalError({ error }: { error: Error & { digest?: string } }) {
useEffect(() => {
captureException(error);
}, [error]);
return (
<html>
<body>
<p>Something went wrong.</p>
</body>
</html>
);
}8Keep keys out of git
Keep keys in environment variables or your host's secret settings, never in code you commit, and add your .env files to .gitignore. A public key in a web page is normal. If a secret key ever ends up in git, a public page, a screenshot or a chat, open API keys, press Create a new secret key, and paste the new key wherever the old one was used: the old key stops working straight away.
.env
.env.local
.env.*.local9Content Security Policy
If your site sends a Content Security Policy, allow script-src https://blipit.io (the script tag, and the reporter editor and replay add-on, which load from blipit.io/sdk/<version>/ on first use), connect-src https://in.blipit.io (events, screenshots and screen recordings all go to in.blipit.io), img-src data: (the screenshot is drawn from an image of the page) and media-src blob: (recordings play back in the reporter). The screenshot reloads the page's images and fonts, so their hosts belong in connect-src too, or they are left blank. No style-src change is needed. With the script tag, call Blipit.init from your own .js file or give the inline script a nonce, because a strict policy blocks inline scripts. For voice in screen recordings, the site's Permissions-Policy header must allow microphone=(self), and display-capture=(self) for screen recording; with microphone=() recordings work without sound.
10Source maps (optional)
So stack traces show your source instead of the minified bundle, upload the maps for each release from your build step.
BLIPIT_KEY=<secret key> npx @blipit/cli sourcemaps upload .next/static --release "$VERCEL_GIT_COMMIT_SHA"11Bug reports: the Report a bug button
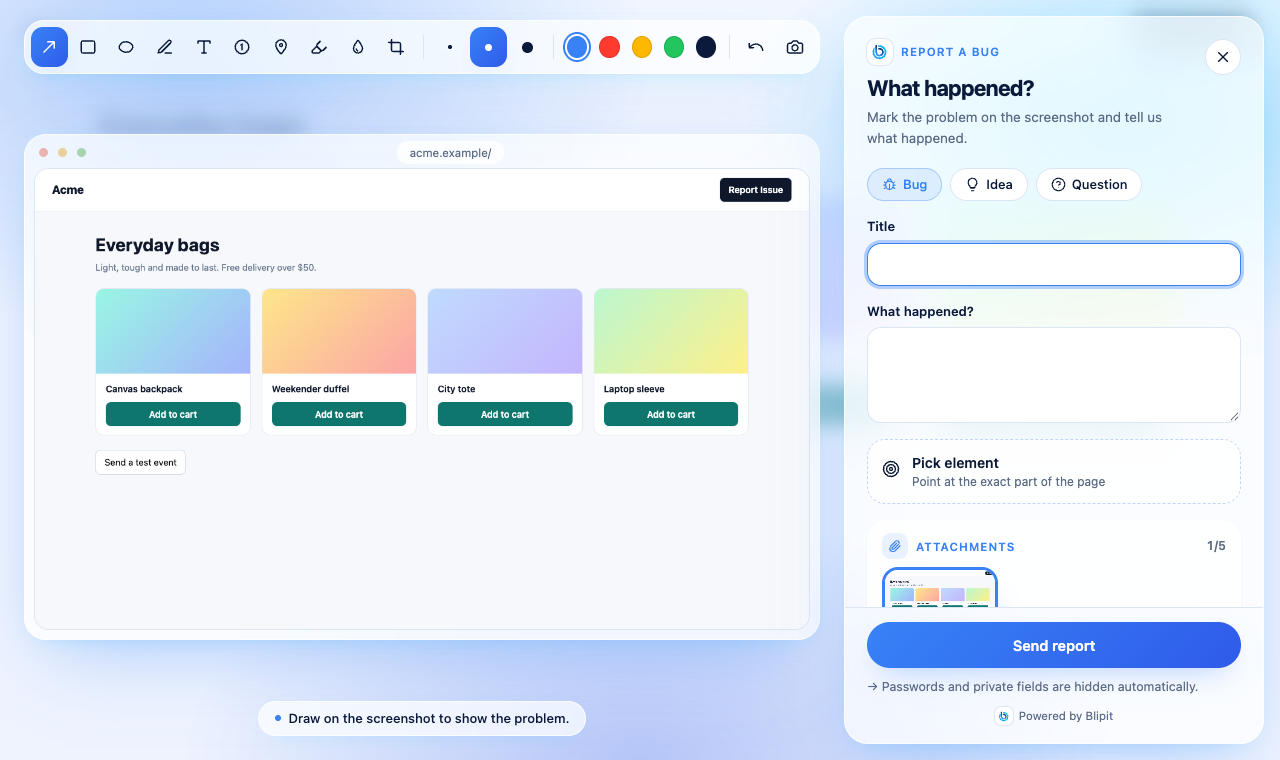
As soon as the SDK starts with your public key, a Report a bug button appears in the bottom-right corner of every page, in the visitor's language. A click opens the reporter: a screenshot of the page to mark up, an element picker, an optional screen recording, and a title and description. Change the position, style, text, colour and keyboard shortcut in code, as below, or for every site at once in app.blipit.io, Project settings, Bug report widget; options in code win. The Bug report button guide shows every option with screenshots and a live demo.
<Blipit
  publicKey={process.env.NEXT_PUBLIC_BLIPIT_KEY!}
  feedbackWidget={{
    position: "bottom-left",
    style: "icon",
    text: "Report Issue",
    color: "#E11D48",
    shortcut: "ctrl+shift+b",
  }}
/>12Open the reporter from your own button
Put the official button anywhere with <BlipitReportButton />, also in server components: it shows the Blipit icon and Report a bug in the visitor's language and opens the reporter. Prefer your own design? The component that calls openReport must be a client component, so put "use client" at the top of its file. <Blipit /> must already be in app/layout.tsx. Plain React apps import the button from @blipit/nextjs/react and openReport from @blipit/browser.
import { BlipitReportButton } from "@blipit/nextjs";

export function Header() {
  return (
    <header>
      <a href="/">Acme</a>
      <BlipitReportButton />
    </header>
  );
}import { BlipitReportButton } from "@blipit/nextjs/react";
<BlipitReportButton variant="outline" size="sm" />"use client";
import { openReport } from "@blipit/nextjs";
export function ReportIssue() {
return <button onClick={() => openReport()}>Report Issue</button>;
}import { openReport } from "@blipit/browser";
export function ReportIssue() {
return <button onClick={() => openReport()}>Report Issue</button>;
}
14Prefill the reporter and add context
Call setUser after sign-in: the reporter's name and email are filled in, and they get an email when you reply or change the status. setReportMetadata adds your own fields, such as the plan or the cart size, to every report; it runs when a report is sent, so the values are current.
"use client";

import { useEffect } from "react";
import { setReportMetadata, setUser } from "@blipit/nextjs";

export function BlipitUser({ user }: { user: { id: string; name: string; email: string; plan: string } }) {
  useEffect(() => {
    setUser({ id: user.id, username: user.name, email: user.email });
    setReportMetadata(() => ({ plan: user.plan }));
  }, [user]);
  return null;
}15Check it works
Reload the app. The Report a bug button appears in the bottom-right corner, and within a minute the page view shows under Web vitals in app.blipit.io. Then add a button that calls captureMessage, or one that throws, and click it: the event shows under Issues within a few seconds.
"use client";
import { captureMessage } from "@blipit/nextjs";

export function TestBlipit() {
  return <button onClick={() => captureMessage("Hello from Next.js")}>Send a test event</button>;
}2Steps for Node.js
Signed in to Blipit? Open your keys page to see these steps with your project's keys already filled in, ready to copy.
Show my keysInstall npm install @blipit/node
1Install
npm install @blipit/node2Get your keys
Sign in at app.blipit.io and open API keys in the sidebar, then your project. Every project has two keys. The public key starts with blipit_pk_: it goes in browser and app code, can only send events, and is safe for anyone to see. The secret key starts with blipit_sk_: it stays on your server or in Odoo, never in a browser, because it can also read and change issues. The secret key is shown only once, right after it is created, so copy it then; if you lose it, press Create a new secret key, and the old one stops working at once. Some SDKs also need the project id, shown on the same page.
3Keep the key in the environment
Node uses the secret key. Put it in an environment variable, never in code: locally in a .env file that Node 20.6 and later load with --env-file, in production in your host's environment or secret settings (Fly secrets, Docker, systemd, Render, Vercel). Restart the process after changing it.
BLIPIT_SECRET_KEY=blipit_sk_your_secret_keynode --env-file=.env --import ./instrument.mjs server.mjs4Keep keys out of git
Keep keys in environment variables or your host's secret settings, never in code you commit, and add your .env files to .gitignore. A public key in a web page is normal. If a secret key ever ends up in git, a public page, a screenshot or a chat, open API keys, press Create a new secret key, and paste the new key wherever the old one was used: the old key stops working straight away.
.env
.env.local
.env.*.local5Initialise first
Put this in a file that runs before your app, and import it first.
import * as Blipit from "@blipit/node";

Blipit.init({
  key: process.env.BLIPIT_SECRET_KEY,
  environment: process.env.NODE_ENV,
  release: process.env.RELEASE,
  serverName: "api",
});6Express, Fastify, Koa, Hono or NestJS
Add the handler after your routes so handled and unhandled errors both reach Blipit, with the request's method, URL and user agent. Koa, Hono and NestJS take one line each: Koa's middleware goes first, Hono's before the routes. They report errors with a status of 500 or above. Requests then show on the Pulse page by route, such as GET /users/:id, instead of one line per URL.
import "./instrument.mjs";
import * as Blipit from "@blipit/node";
import express from "express";

const app = express();
app.get("/", (req, res) => res.send("ok"));
app.use(Blipit.expressErrorHandler());
app.listen(3000);await app.register(Blipit.fastifyPlugin());app.use(Blipit.koaMiddleware());app.use(Blipit.honoMiddleware());app.useGlobalInterceptors(Blipit.nestInterceptor());7Serverless: AWS Lambda and Vercel
Serverless hosts pause the function as soon as it answers, and Lambda does not run Node's HTTP server, so wrap the handler. wrapHandler records the request (API Gateway, function URL and load balancer events by method and route, other events by function name), reports errors and sends everything before the handler returns; it waits only when there is something to send, at most 2 seconds. traceRequest does the same for any handler that takes a Request. On Vercel the data goes out after the response through waitUntil, so nothing is delayed. In Next.js use withBlipit (see the Next.js guide).
import * as Blipit from "@blipit/node";

export const handler = Blipit.wrapHandler(async (event, context) => {
  return { statusCode: 200, body: "ok" };
});export default { fetch: (request) => Blipit.traceRequest(request, () => app.fetch(request)) };8Manual capture, logs and login attempts
Blipit.captureException(err);
Blipit.captureMessage("cache miss rate above 50%", "warning");
Blipit.setUser({ id: "user-42" });
Blipit.log.info("order placed", { order_id: 42 });
Blipit.captureSecurity({ kind: "login_failed", actor: email, ip, userAgent, outcome: "bad_password" });
await Blipit.flush();9Dependencies and server health
From 0.2 the SDK also records your database and outside-service calls, and your server's CPU, memory and event loop. See the Dependencies and Server health guides; tracesSampleRate, tracing: false and metrics: false control it.
10Check it works
Open Issues in app.blipit.io. The first event appears within a few seconds, grouped into an issue, and the people in charge get an email.
Blipit.captureMessage("Hello from Node");2Steps for Python
Signed in to Blipit? Open your keys page to see these steps with your project's keys already filled in, ready to copy.
Show my keysInstall pip install blipit
1Install
pip install blipit2Initialise at startup
For Django, put it at the top of settings.py. For Flask or FastAPI, before the app is created. The key is on the project's Keys page. With an empty key, init logs a warning and returns False instead of raising, so a missing key never stops the app from starting.
import blipit

blipit.init(
    key="<public key>",
    environment="production",
    release="myapp@1.4.2",
)3Get your keys
Sign in at app.blipit.io and open API keys in the sidebar, then your project. Every project has two keys. The public key starts with blipit_pk_: it goes in browser and app code, can only send events, and is safe for anyone to see. The secret key starts with blipit_sk_: it stays on your server or in Odoo, never in a browser, because it can also read and change issues. The secret key is shown only once, right after it is created, so copy it then; if you lose it, press Create a new secret key, and the old one stops working at once. Some SDKs also need the project id, shown on the same page.
4Keep the key in the environment
This SDK sends with the public key from the project's API keys page. Keep it in an environment variable: locally in a .env file loaded by your framework or python-dotenv, in production in your host's settings. Use the secret key only if you send login attempts.
BLIPIT_KEY=blipit_pk_your_public_keyimport os
import blipit
blipit.init(key=os.environ.get("BLIPIT_KEY"))5Keep keys out of git
Keep keys in environment variables or your host's secret settings, never in code you commit, and add your .env files to .gitignore. A public key in a web page is normal. If a secret key ever ends up in git, a public page, a screenshot or a chat, open API keys, press Create a new secret key, and paste the new key wherever the old one was used: the old key stops working straight away.
.env
.env.local
.env.*.local6Manual capture and login attempts
Login attempts need the secret key: on the server, init with the secret key instead of the public one, or ingest refuses them with 403 security_needs_secret_key. Scale plan.
blipit.capture_exception(err)
blipit.capture_message("cache miss rate above 50%", level="warning")
blipit.set_user({"id": "42", "email": "ana@example.com"})
blipit.set_context("order", {"id": 1042, "total": 99.5})
blipit.capture_security("login_failed", actor=email, ip=request.META.get("REMOTE_ADDR"), outcome="bad_password")7Check it works
Open Issues in app.blipit.io. The first event appears within a few seconds, grouped into an issue, and the people in charge get an email.
blipit.capture_message("Hello from Python")2Steps for PHP and Laravel
Signed in to Blipit? Open your keys page to see these steps with your project's keys already filled in, ready to copy.
Show my keysInstall composer require blipit/blipit
1Install
composer require blipit/blipit2Initialise at startup
Plain PHP: at the top of your front controller, before any request is handled. Laravel starts Blipit from its config, as in the next step. The key is on the project's Keys page. With an empty key, init writes a warning to the error log and returns false instead of throwing.
use Blipit\Blipit;

Blipit::init([
    "key" => "<public key>",
    "environment" => "production",
    "release" => "myapp@1.4.2",
]);3Get your keys
Sign in at app.blipit.io and open API keys in the sidebar, then your project. Every project has two keys. The public key starts with blipit_pk_: it goes in browser and app code, can only send events, and is safe for anyone to see. The secret key starts with blipit_sk_: it stays on your server or in Odoo, never in a browser, because it can also read and change issues. The secret key is shown only once, right after it is created, so copy it then; if you lose it, press Create a new secret key, and the old one stops working at once. Some SDKs also need the project id, shown on the same page.
4Keep the key in the environment
This SDK sends with the public key. Laravel: add it to .env and to config/services.php; the Blipit service provider is discovered on its own and starts Blipit from that config, so nothing else is needed. Read values through config, because env() returns nothing in app code once the config is cached. Plain PHP: read the key with getenv() from the server's environment.
BLIPIT_KEY=blipit_pk_your_public_key'blipit' => [
'key' => env('BLIPIT_KEY'),
'environment' => env('APP_ENV'),
'release' => env('GIT_SHA'),
],5Keep keys out of git
Keep keys in environment variables or your host's secret settings, never in code you commit, and add your .env files to .gitignore. A public key in a web page is normal. If a secret key ever ends up in git, a public page, a screenshot or a chat, open API keys, press Create a new secret key, and paste the new key wherever the old one was used: the old key stops working straight away.
.env
.env.local
.env.*.local6Laravel and Symfony
Laravel: every exception its handler reports reaches Blipit, so 404s and validation errors stay out. Queries, log lines and HTTP client calls become breadcrumbs, and queued jobs are traced. A Blipit::captureException line you already have in bootstrap/app.php can stay: the same exception is never sent twice. Symfony: register the listener in config/services.yaml and call Blipit::init early in public/index.php and bin/console.
Blipit\Symfony\BlipitListener:
    arguments: ['@router']
    tags:
        - { name: kernel.event_listener, event: kernel.exception, method: onKernelException }
        - { name: kernel.event_listener, event: kernel.request, method: onKernelRequest }
        - { name: kernel.event_listener, event: kernel.terminate, method: onKernelTerminate }
- { name: kernel.event_listener, event: console.error, method: onConsoleError }7Manual capture and login attempts
Login attempts need the secret key: on the server, init with the secret key instead of the public one, or ingest refuses them with 403 security_needs_secret_key. Scale plan.
Blipit::captureException($e);
Blipit::captureMessage("cache miss rate above 50%", "warning");
Blipit::setUser(["id" => "42", "email" => "ana@example.com"]);
Blipit::captureSecurity("login_failed", $email, "bad_password", null, $request->ip(), $request->userAgent());8Check it works
Open Issues in app.blipit.io. The first event appears within a few seconds, grouped into an issue, and the people in charge get an email.
Blipit::captureMessage("Hello from PHP");2Steps for Ruby and Rails
Signed in to Blipit? Open your keys page to see these steps with your project's keys already filled in, ready to copy.
Show my keysInstall gem install blipit
1Gemfile
gem "blipit"2Initialise at startup
Rails: config/initializers/blipit.rb; nothing else to install, because Blipit adds its Rack middleware, Active Job and Rails.error reporting on its own. Rack and Sinatra apps add use Blipit::Rack. Scripts: before your code runs. The key is on the project's Keys page. With an empty key, init prints a warning and returns false instead of raising.
Blipit.init(
  key: "<public key>",
  environment: Rails.env,
  release: ENV["RELEASE"],
)3Get your keys
Sign in at app.blipit.io and open API keys in the sidebar, then your project. Every project has two keys. The public key starts with blipit_pk_: it goes in browser and app code, can only send events, and is safe for anyone to see. The secret key starts with blipit_sk_: it stays on your server or in Odoo, never in a browser, because it can also read and change issues. The secret key is shown only once, right after it is created, so copy it then; if you lose it, press Create a new secret key, and the old one stops working at once. Some SDKs also need the project id, shown on the same page.
4Keep the key in Rails credentials
This SDK sends with the public key. In Rails, keep it in the encrypted credentials and read it in the initializer; elsewhere, use an environment variable.
bin/rails credentials:editblipit:
key: blipit_pk_your_public_keyBlipit.init(
key: Rails.application.credentials.dig(:blipit, :key),
environment: Rails.env,
)5Keep keys out of git
Keep keys in environment variables or your host's secret settings, never in code you commit, and add your .env files to .gitignore. A public key in a web page is normal. If a secret key ever ends up in git, a public page, a screenshot or a chat, open API keys, press Create a new secret key, and paste the new key wherever the old one was used: the old key stops working straight away.
.env
.env.local
.env.*.local6Manual capture and login attempts
Login attempts need the secret key: on the server, init with the secret key instead of the public one, or ingest refuses them with 403 security_needs_secret_key. Scale plan.
Blipit.capture_exception(e)
Blipit.capture_message("cache miss rate above 50%", level: :warning)
Blipit.set_user(id: "42", email: "ana@example.com")
Blipit.capture_security("login_failed", email, outcome: "bad_password", ip: request.remote_ip, user_agent: request.user_agent)7Check it works
Open Issues in app.blipit.io. The first event appears within a few seconds, grouped into an issue, and the people in charge get an email.
Blipit.capture_message("Hello from Rails")2Steps for Go
Signed in to Blipit? Open your keys page to see these steps with your project's keys already filled in, ready to copy.
Show my keysInstall go get github.com/blipit-io/blipit-go
1Install
go get github.com/blipit-io/blipit-go2Initialise in main
Init never panics: with an empty key or project id it returns an error and Blipit stays off, so log the error instead of exiting.
import (
    "log"
    "time"

    "github.com/blipit-io/blipit-go"
)

func main() {
    if err := blipit.Init(blipit.Options{
        Key:         "<public key>",
        Project:     "<project id>",
        Environment: "production",
        Release:     "myapp@1.4.2",
    }); err != nil {
        log.Printf("blipit: %v", err)
    }
    defer blipit.Flush(2 * time.Second)
}3Get your keys
Sign in at app.blipit.io and open API keys in the sidebar, then your project. Every project has two keys. The public key starts with blipit_pk_: it goes in browser and app code, can only send events, and is safe for anyone to see. The secret key starts with blipit_sk_: it stays on your server or in Odoo, never in a browser, because it can also read and change issues. The secret key is shown only once, right after it is created, so copy it then; if you lose it, press Create a new secret key, and the old one stops working at once. Some SDKs also need the project id, shown on the same page.
4Keep the key in the environment
This SDK sends with the public key and the project id. Read them from environment variables set by your host, a systemd unit or docker run -e.
blipit.Init(blipit.Options{
    Key:     os.Getenv("BLIPIT_KEY"),
    Project: os.Getenv("BLIPIT_PROJECT"),
})5Keep keys out of git
Keep keys in environment variables or your host's secret settings, never in code you commit, and add your .env files to .gitignore. A public key in a web page is normal. If a secret key ever ends up in git, a public page, a screenshot or a chat, open API keys, press Create a new secret key, and paste the new key wherever the old one was used: the old key stops working straight away.
.env
.env.local
.env.*.local6Manual capture and login attempts
Login attempts need the secret key: on the server, init with the secret key instead of the public one, or ingest refuses them with 403 security_needs_secret_key. Scale plan.
blipit.CaptureException(err)
blipit.CaptureMessage("cache miss rate above 50%")
blipit.SetUser(blipit.User{ID: "42", Email: "ana@example.com"})
blipit.CaptureSecurity(blipit.Security{Kind: "login_failed", Actor: email, IP: ip, UserAgent: agent, Outcome: "bad_password"})7Panics and net/http
defer blipit.Recover() at the top of main or of any goroutine reports a panic with its stack, flushes and panics again. Wrap the handler you serve with blipit.Handler to report panics with the request and time each request on Pulse, named by its ServeMux pattern. Gin, Echo and Fiber use StartRequest, SetRoute and End, shown in the package README.
go func() {
    defer blipit.Recover()
    work()
}()

mux := http.NewServeMux()
mux.HandleFunc("GET /items/{id}", item)
http.ListenAndServe(":8080", blipit.Handler(mux))8Check it works
Open Issues in app.blipit.io. The first event appears within a few seconds, grouped into an issue, and the people in charge get an email.
blipit.CaptureMessage("Hello from Go")2Steps for Java and Kotlin
Signed in to Blipit? Open your keys page to see these steps with your project's keys already filled in, ready to copy.
Show my keysInstall com.github.blipit-io:blipit-java
1Add the repository and dependency
repositories {
    mavenCentral()
    maven("https://jitpack.io")
}

dependencies {
    implementation("com.github.blipit-io:blipit-java:v0.2.1")
}<repositories>
<repository>
<id>jitpack.io</id>
<url>https://jitpack.io</url>
</repository>
</repositories>
<dependency>
<groupId>com.github.blipit-io</groupId>
<artifactId>blipit-java</artifactId>
<version>v0.2.1</version>
</dependency>2Initialise at startup
Spring Boot: at the top of main, before SpringApplication.run, or in a @PostConstruct method of a @Configuration class. Uncaught exceptions on any thread are written to a queue on disk before the app stops, then sent, so a crash is reported even if the network is down; anything left over goes out on the next start.
import io.blipit.Blipit;
import io.blipit.BlipitOptions;

Blipit.init(BlipitOptions.builder()
    .key("<public key>")
    .project(<project id>)
    .environment("production")
    .release("myapp@1.4.2")
.build());3Get your keys
Sign in at app.blipit.io and open API keys in the sidebar, then your project. Every project has two keys. The public key starts with blipit_pk_: it goes in browser and app code, can only send events, and is safe for anyone to see. The secret key starts with blipit_sk_: it stays on your server or in Odoo, never in a browser, because it can also read and change issues. The secret key is shown only once, right after it is created, so copy it then; if you lose it, press Create a new secret key, and the old one stops working at once. Some SDKs also need the project id, shown on the same page.
4Keep the key in the environment
This SDK sends with the public key and the project id. Read them from environment variables, or in Spring Boot from application.properties filled from the environment.
blipit.key=${BLIPIT_KEY}
blipit.project=${BLIPIT_PROJECT}Blipit.init(BlipitOptions.builder()
.key(System.getenv("BLIPIT_KEY"))
.project(Long.parseLong(System.getenv("BLIPIT_PROJECT")))
.build());5Keep keys out of git
Keep keys in environment variables or your host's secret settings, never in code you commit, and add your .env files to .gitignore. A public key in a web page is normal. If a secret key ever ends up in git, a public page, a screenshot or a chat, open API keys, press Create a new secret key, and paste the new key wherever the old one was used: the old key stops working straight away.
.env
.env.local
.env.*.local6Manual capture and login attempts
Login attempts need the secret key: on the server, init with the secret key instead of the public one, or ingest refuses them with 403 security_needs_secret_key. Scale plan.
Blipit.captureException(err);
Blipit.captureMessage("cache miss rate above 50%");
Blipit.captureMessage("disk almost full", Level.WARNING);
Blipit.setUser("42", "ana@example.com");
Blipit.addBreadcrumb("GET /api/cart 500", "http", Level.ERROR);
Blipit.captureSecurity("login_failed", email, "bad_password", null, ip, userAgent, null);7Check it works
Open Issues in app.blipit.io. The first event appears within a few seconds, grouped into an issue, and the people in charge get an email.
Blipit.captureMessage("Hello from Java");2Steps for .NET
Signed in to Blipit? Open your keys page to see these steps with your project's keys already filled in, ready to copy.
Show my keysInstall dotnet add package Blipit
1Install
dotnet add package Blipit2Initialise at startup
Keep the returned handle alive for the life of the process. Both values are on the project's Keys page.
using Blipit;

using var blipit = Blipit.Blipit.Init(new BlipitOptions
{
    Key = "<public key>",
    Project = "<project id>",
    Environment = "production",
    Release = "myapp@1.4.2",
});3Get your keys
Sign in at app.blipit.io and open API keys in the sidebar, then your project. Every project has two keys. The public key starts with blipit_pk_: it goes in browser and app code, can only send events, and is safe for anyone to see. The secret key starts with blipit_sk_: it stays on your server or in Odoo, never in a browser, because it can also read and change issues. The secret key is shown only once, right after it is created, so copy it then; if you lose it, press Create a new secret key, and the old one stops working at once. Some SDKs also need the project id, shown on the same page.
4Keep the key in configuration
This SDK sends with the public key and the project id. Keep them in user secrets while developing and in environment variables in production (Blipit__Key and Blipit__Project), then read them from configuration.
dotnet user-secrets set "Blipit:Key" "blipit_pk_your_public_key"
dotnet user-secrets set "Blipit:Project" "12"using var blipit = Blipit.Blipit.Init(new BlipitOptions
{
Key = builder.Configuration["Blipit:Key"],
Project = builder.Configuration["Blipit:Project"],
});5Keep keys out of git
Keep keys in environment variables or your host's secret settings, never in code you commit, and add your .env files to .gitignore. A public key in a web page is normal. If a secret key ever ends up in git, a public page, a screenshot or a chat, open API keys, press Create a new secret key, and paste the new key wherever the old one was used: the old key stops working straight away.
.env
.env.local
.env.*.local6ASP.NET Core and logging
Nothing else to add: call Init at the top of Program.cs. Exceptions from endpoints, controllers and middleware are reported with the request, also when UseExceptionHandler handles them, and with TracesSampleRate set each sampled request is timed on Pulse by its route. BlipitLoggerProvider turns Information and above into breadcrumbs and Error and above into events.
var builder = WebApplication.CreateBuilder(args);
using var blipit = Blipit.Blipit.Init(new BlipitOptions
{
    Key = builder.Configuration["Blipit:Key"],
    Project = builder.Configuration["Blipit:Project"],
    TracesSampleRate = 0.2,
});
builder.Logging.AddProvider(new BlipitLoggerProvider());7Manual capture and login attempts
Login attempts need the secret key: on the server, init with the secret key instead of the public one, or ingest refuses them with 403 security_needs_secret_key. Scale plan.
Blipit.Blipit.CaptureException(ex);
Blipit.Blipit.CaptureMessage("cache miss rate above 50%", BlipitLevel.Warning);
Blipit.Blipit.SetUser(id: "42", email: "ana@example.com");
Blipit.Blipit.CaptureSecurity("login_failed", email, "bad_password", null, ip, userAgent, null);8Check it works
Open Issues in app.blipit.io. The first event appears within a few seconds, grouped into an issue, and the people in charge get an email.
Blipit.Blipit.CaptureMessage("Hello from .NET");2Steps for iOS, Android, Flutter, React Native
Signed in to Blipit? Open your keys page to see these steps with your project's keys already filled in, ready to copy.
Show my keysInstall one package per platform
1Get your keys
Sign in at app.blipit.io and open API keys in the sidebar, then your project. Every project has two keys. The public key starts with blipit_pk_: it goes in browser and app code, can only send events, and is safe for anyone to see. The secret key starts with blipit_sk_: it stays on your server or in Odoo, never in a browser, because it can also read and change issues. The secret key is shown only once, right after it is created, so copy it then; if you lose it, press Create a new secret key, and the old one stops working at once. Some SDKs also need the project id, shown on the same page.
2React Native
The package links a small native module that starts Blipit's own Android and iOS SDKs for native crashes; its Gradle file adds the JitPack repository on its own. Wrap the root component so render errors are reported too.
npm install @blipit/react-native
npx pod-installimport * as Blipit from "@blipit/react-native";
Blipit.init({ key: "<public key>", project: <project id>, environment: "production", release: "myapp@1.4.2" });
export default Blipit.wrap(App);3Flutter
Replace runApp in main.dart with Blipit.init. The plugin starts Blipit's own Android and iOS SDKs for native crashes, and Flutter framework errors and uncaught async errors are reported on their own.
flutter pub add blipit_flutterimport 'package:blipit_flutter/blipit_flutter.dart';
Future<void> main() async {
await Blipit.init(
key: '<public key>',
project: <project id>,
environment: 'production',
release: 'myapp@1.4.2',
appRunner: () => runApp(const MyApp()),
);
}4iOS and macOS (Swift Package)
In Xcode, File, Add Package Dependencies, and enter the repository URL; or add it to Package.swift and add BlipitSwift to your target. With CocoaPods, use the BlipitSwift pod. Then call start once at launch. With an empty key or project id, start prints a warning and returns false instead of crashing the app.
.package(url: "https://github.com/blipit-io/blipit-swift", from: "0.6.0")pod "BlipitSwift", "~> 0.6.0"import BlipitSwift
Blipit.start(key: "<public key>", project: "<project id>", environment: "production", release: "myapp@1.4.2")5Android
Add JitPack to the repositories in settings.gradle.kts, the dependency to the app module, and call init in Application.onCreate.
dependencyResolutionManagement {
    repositories {
        google()
        mavenCentral()
        maven("https://jitpack.io")
    }
}implementation("com.github.blipit-io:blipit-android:v0.6.0")import io.blipit.android.Blipit
class App : Application() {
override fun onCreate() {
super.onCreate()
Blipit.init(this) {
key = "<public key>"
project = "<project id>"
environment = "production"
release = "myapp@1.4.2"
}
}
}6Where the key goes in an app
Apps ship the public key and the project id inside the app, which is fine: the public key can only send events. Never put the secret key in an app. Pass them in at build time so they stay out of your repository.
flutter run --dart-define=BLIPIT_KEY=blipit_pk_your_public_key --dart-define=BLIPIT_PROJECT=12const key = String.fromEnvironment('BLIPIT_KEY');
const project = int.fromEnvironment('BLIPIT_PROJECT');EXPO_PUBLIC_BLIPIT_KEY=blipit_pk_your_public_key
EXPO_PUBLIC_BLIPIT_PROJECT=12buildConfigField("String", "BLIPIT_KEY", ""${project.findProperty("blipitKey")}"")BLIPIT_KEY = blipit_pk_your_public_key7Bug reports in apps
Call showReport from your own menu item, or turn on the floating Report a bug button. The reporter first asks how to show the problem: take a screenshot, record the screen (iOS) or just describe it. The screenshot opens full screen with the tools above and below it, never on top; pinch or double-tap to zoom, mark the problem, then add a title and what happened and send. Reports arrive under Bug reports with the device details. React Native needs react-native-view-shot for screenshots.
import * as Blipit from "@blipit/react-native";

export default function Root() {
  return (
    <Blipit.BlipitReporter showButton>
      <App />
    </Blipit.BlipitReporter>
  );
}

Blipit.showReport();appRunner: () => runApp(const BlipitReporter(showButton: true, child: MyApp())),
Blipit.showReport();Blipit.showReportButton()
Blipit.showReport()Blipit.showReportButton()
Blipit.showReport()8Report from the screen with the bug
A Report a bug item in a menu such as Profile captures the menu, not the problem. Turn on the ways that start from the screen itself; they are off by default and need no permission prompt. shakeToReport opens the reporter when the phone is shaken. screenshotToReport asks "Report a bug with this screen?" after a normal screenshot and attaches Blipit's own capture (iOS, and Android 14 and newer). twoFingerReport opens it after a two-finger press and hold of about a second, without blocking the app's own touches. reportAfterCrash asks what the person was doing on the first launch after a crash and links the report to that crash. screenPicker, on by default, lets someone who opens the reporter from a menu pick which of the last few screens the bug is on: the snapshots stay in memory on the device and only the chosen one is uploaded. Jetpack Compose and SwiftUI apps name their screens with setScreen.
Blipit.init(this) {
    key = "<public key>"
    project = "<project id>"
    shakeToReport = true
    screenshotToReport = true
    twoFingerReport = true
    reportAfterCrash = true
}

navController.addOnDestinationChangedListener { _, destination, _ ->
    Blipit.setScreen(destination.route ?: "screen")
}Blipit.start(key: "<public key>", project: "<project id>") { options in
options.shakeToReport = true
options.screenshotToReport = true
options.twoFingerReport = true
options.reportAfterCrash = true
}
CartView().onAppear { Blipit.setScreen("Cart") }Blipit.init({
key: "<public key>",
project: <project id>,
shakeToReport: true,
screenshotToReport: true,
twoFingerReport: true,
reportAfterCrash: true,
});
<NavigationContainer ref={navigation} onReady={() => Blipit.trackNavigation(navigation)}>await Blipit.init(
key: '<public key>',
project: <project id>,
shakeToReport: true,
screenshotToReport: true,
twoFingerReport: true,
reportAfterCrash: true,
appRunner: () => runApp(BlipitReporter(child: MaterialApp(navigatorObservers: [BlipitNavigatorObserver()], home: const Home()))),
);10Catch an app that gets stuck
Some failures never crash: the splash screen keeps spinning, or sign-in never comes back. Turn on waitForReady and call reportReady once the first usable screen shows. Wrap flows such as sign-in in startFlow and endFlow, and mark steps with flowStep. When one does not finish in time, Blipit opens a Stuck issue with the last step and the trail before it. Only time on screen counts, and Blipit sets the time limits. Names are sent as written, so use fixed names, never emails or other user data.
Blipit.init(this) {
    key = "<public key>"
    project = "<project id>"
    waitForReady = true
}

Blipit.reportReady()

Blipit.startFlow("sign-in")
Blipit.flowStep("sign-in", "google-picker")
Blipit.endFlow("sign-in")Blipit.start(key: "<public key>", project: "<project id>", waitForReady: true)
Blipit.reportReady()
Blipit.startFlow("sign-in")
Blipit.flowStep("sign-in", "apple-sheet")
Blipit.endFlow("sign-in")Blipit.init({ key: "<public key>", project: <project id>, waitForReady: true });
Blipit.reportReady();
Blipit.startFlow("sign-in");
Blipit.flowStep("sign-in", "google-picker");
Blipit.endFlow("sign-in");await Blipit.init(key: '<public key>', project: <project id>, waitForReady: true, appRunner: () => runApp(const MyApp()));
Blipit.reportReady();
Blipit.startFlow('sign-in');
Blipit.flowStep('sign-in', 'google-picker');
Blipit.endFlow('sign-in');11Check it works
Open Issues in app.blipit.io. The first event appears within a few seconds, grouped into an issue, and the people in charge get an email.
2Steps for Odoo
Signed in to Blipit? Open your keys page to see these steps with your project's keys already filled in, ready to copy.
Show my keysInstall Blipit Error Monitoring on the Odoo Apps store
1Install the module
Download it from apps.odoo.com (blipit_monitor, free) for your Odoo version and install it like any module: Apps, Update Apps List, install Blipit Error Monitoring. Odoo Online does not allow third-party apps; Odoo.sh and on-premise do.
2Get your keys
Sign in at app.blipit.io and open API keys in the sidebar, then your project. Every project has two keys. The public key starts with blipit_pk_: it goes in browser and app code, can only send events, and is safe for anyone to see. The secret key starts with blipit_sk_: it stays on your server or in Odoo, never in a browser, because it can also read and change issues. The secret key is shown only once, right after it is created, so copy it then; if you lose it, press Create a new secret key, and the old one stops working at once. Some SDKs also need the project id, shown on the same page.
3Connect
Settings, Blipit: paste the project's secret key, tick the agreement to the Terms and the module licence, and press Save. It connects on its own and shows Connected to <project>. A public key or a key already bound to another database is refused with the reason.
4People in charge
Pick who gets emailed, per company if you have several. Each person takes one seat of your plan; Blipit checks the count when you save.
5Bug reports from Odoo
The module adds the Report a bug button to Odoo for you; there is no code to write. Under Settings, Blipit, Bug reports, Shown to, choose who sees it: Internal users, Website visitors, Both or Nobody, and optionally limit internal users to one group. Reports carry the model, record and field the person was on, and the signed-in user's name and email are filled in. Position, colour, text and style come from app.blipit.io, Project settings, Bug report widget. See the Bug report button guide for every option.
6Check it works
Open the Blipit app in Odoo. The next error shows up there and in the people in charge's inbox. Click Refresh from Blipit to check straight away.